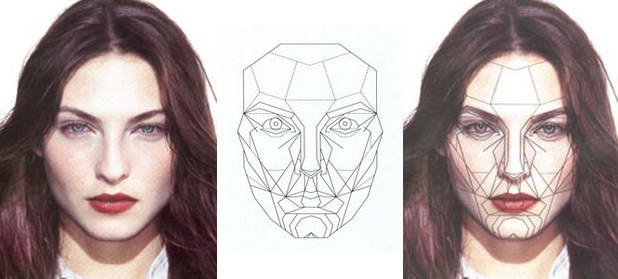
Repose Frontal Mask
USES OF THE REPOSE FRONTAL MASK:
You can overlay the Repose Frontal Mask (also called the RF Mask or Repose Expression Frontal View Mask) over a photograph of your own face to help you apply makeup, to aid in evaluating your face for facial surgery, or simply to see how much your face conforms to the measurements of the Golden Ratio.
REPOSE FRONTAL MASK OVERVIEW:
The frontal view of the face is the most important view because we generally perceive (or view) each other (particularly when we interact socially) from the front not from the side. Our evaluation of how human another face appears occurs from the frontal view. Therefore this view is MOST critical for our evaluation of another individuals humanness (Or Attractiveness). If the face were a song, one could think of the front view as the melody and the side view as the harmony or overtones.
In the frontal view, the vertical relationships between the facial components as well as the horizontal relationships between the facial components can both be assessed.
Note: In the lateral view the vertical relationships between the facial components are seen as well, however the view of the front to back (anterior-posterior) relationships between the facial components replaces the view of the horizontal relationships between the facial components.
REPOSE FRONTAL MASK APPLICATION PROTOCOL:
(How to apply the Repose Frontal Beauty Mask to your own photo)
1. THIS IS WHAT YOU’LL NEED:
- A camera, and a friend to take your picture
- Access to a copy machine which can re-size pictures
- Sheets of clear acetate (A4 or Letter) to make copies of the mask
- A ruler to measure your face
- A print of the mask: Click here for a copy of the Repose Frontal Beauty Mask for your personal use
You’ll have to take a picture especially for this experiment, because it’s important to make sure your head is tilted to match the grid of the mask. This is simple to do, but important to get right. Carefully follow the instructions and alignment diagrams, below.
2. TAKING THE PHOTO OF YOUR FACE:
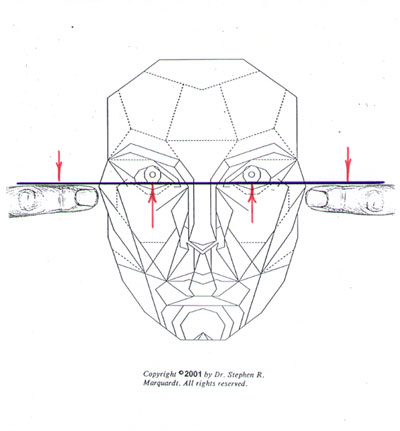
A. PROPER HEAD POSITION / ALIGNMENT FOR TAKING THE REPOSE FRONTAL PHOTOGRAPH
Face directly into the camera so that your face isn’t turned right or left even slightly. Place the tips of your index fingers gently against the holes in your ears, keeping your fingers straight and horizontal. Do not put your fingers into your ears. Now, tilt your head up or down until the bottoms of your right and left irises (the round colored part of your eye) are aligned on the top of an imaginary line connecting the tops of your index fingers, as seen through the camera lens/viewfinder. Let the person taking the picture tell you when you’re in the right position. (see alignment diagram)

With a relaxed face and without smiling, place your back teeth together so that they barely touch and bring your lips together, until they touch gently. Note: Your head will seem to be tilted slightly down.
B. CAPTURING THE IMAGE FOR THE PHOTOGRAPH
Now without moving your head, put your hands down and take the picture while your face is in exactly that position.
3. DEVELOPING THE PHOTOGRAPH
The photo size should ideally be as large as 18 X 13cm or 20 X 26cm, (5″ X 7″ or 8″ X 10″). A smaller image will be much less clear and accurate.
4. CREATING THE CORRECT SIZE MASK FOR YOUR PHOTOGRAPH:
On the photo of your face:
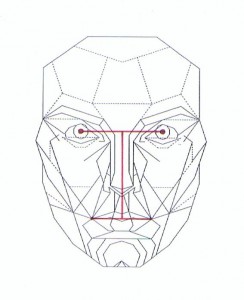
Create a line connecting the center of your right and left pupils (the round black center part of your eyes). This is your pupil line.
Create a second line connecting the right and left corners of your mouth. This is your lip line.
Create a third line connecting the middle (or center) of your pupil line with the middle (or center) of your lip line. This is your facial vertical line. (see diagram)
Take your copy of the mask and enlarge or shrink it on a copy machine until the facial vertical line (the vertical distance from the lip line to the pupil line) on the mask is the same as that distance on your face photo. Click on the image above to see larger version of the Repose Frontal Mask.
Copy the final correctly sized mask image onto a sheet of clear acetate.
5. APPLYING THE MASK TO THE PHOTOGRAPH:
Place the clear acetate mask over your face photo and match up the pupil line, the lip line and the facial vertical line of the mask with the pupil line, the lip line and the facial vertical line of the photo of your face.
You can make a few copies of the mask which are progressively slightly larger and slightly smaller than the original acetate. You can use these to see if you can increase the degree of overall fit of your face photograph by slightly adjusting the size of the mask.
When you have found the size that most closely fits your face photo you can take a closer look at your overall fit to the mask.
